Here's how you can use HandBrake, a fantastic tool for working with video files. If you're looking for a way to convert or compress your videos, HandBrake is a popular choice.
First things first, getting HandBrake is simple. All you need to do is go to the HandBrake website and simply go and click download and go and install HandBrake. Once installed, you'll be taken to its main interface.
To start, you need to open a video file. You can either find a folder full of videos you want to process, open up a single one, or just drag a file onto the HandBrake window. We've got a lot of options. Once you select your video, HandBrake will scan it. It's useful to know the original file size before you start. For instance, an example video might be 139 megabytes. We can compare this later to see the difference HandBrake makes.
After importing your video, HandBrake allows you to do everything to it. You can click 'Open Source' to select another file if needed. If you have many videos, you can add them to a queue using 'Add to Queue', which is really cool if you've got a ton of videos you want to put through HandBrake. The 'Start Encode' button begins the conversion process, but let's look at the settings first.
The 'Preset' menu is where things can get interesting. Clicking on 'Preset' reveals options grouped under categories like 'General'. You'll find presets like 'Fast 1080p 30'. Basically, 'Very Fast' presets offer lower quality within the specified resolution (like 1080p 30fps), while higher quality presets might take a bit longer. It essentially depends on how long you want to wait and the quality you want.
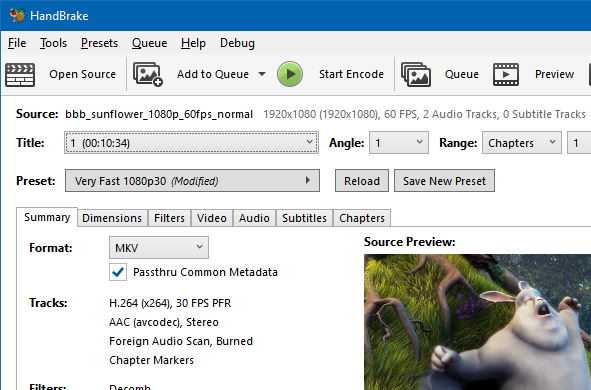
Under 'Summary', you can choose the format. Personally, I like to have my videos in MP4, but you can also choose MKV or WebM. There's an option for 'Web Optimized', which I personally don't bother with. I do use 'Align A/V Start' because it helps audio and video sync and avoids distortion.
Moving to the 'Dimensions' tab, you can change the size and crop your video if you'd like, perhaps changing it to 1280x720. The 'Filters' tab lets you add effects like sharpening. It's probably best to do a test video and spend a bit of time seeing what the filters can do; personally, I don't use them often.
The 'Video' tab offers some awesome stuff. You can change the video codec by clicking the dropdown menu. The frame rate setting is really useful. You can keep it the same as the source, or change it. For example, if you have a 60fps video and want it to be 30fps, select 30. One thing I usually change with the frame rate is to select 'Constant Framerate'; otherwise, the frame rate might vary throughout the video. For quality, I recommend setting it to 'Constant Quality' to avoid variations. The 'Encoder Preset' slider lets you trade off encoding speed versus output quality. I just leave it in the middle, which is the default, but you could change that.
The 'Audio', 'Subtitles', and 'Chapters' tabs offer more controls, but often don't need adjusting for basic conversions. Once you're happy with the settings, it's recommended to change the 'Save As' output location and filename. Click 'Browse', choose a destination like your desktop, and give it a clear name like 'finished'.
Finally, click 'Start Encode'. HandBrake will begin processing the video. After it's finished, you can compare the file sizes. That example 139 MB file might become only 21 MB – quite a drastic change, around seven times smaller! It is definitely worth putting videos through HandBrake as it is going to go and save file size without reducing the quality too much, and as shown, you can control the quality within HandBrake as well.
About HandBrake
HandBrake is a free and open-source tool for converting video from nearly any format to a selection of modern, widely supported codecs. It's designed to make ripping a film from a DVD to a data storage device easier. Since then, it has undergone many changes and revisions and is now available for Linux, macOS, and Windows.
Key Features
- Format Conversion: Convert video files between various formats like MP4, MKV, and WebM.
- Presets: Built-in device presets get you started quickly, or choose universal presets for standard or high-quality conversions.
- Customization: Fine-tune settings including video codec, frame rate (constant or variable), quality (constant quality or average bitrate), dimensions, cropping, and filters.
- Audio & Subtitles: Pass-through or convert audio tracks, and add or pass-through subtitles.
- Chapter Markers: Support for creating and adding chapter markers.
- Batch Encoding: Queue up multiple files for encoding sequentially.
- Cross-Platform: Available on Windows, macOS, and Linux.
- Size Reduction: Significantly reduces file size while maintaining good quality.
Pros
- ✅ Free and open-source software.
- ✅ Excellent file size reduction capabilities.
- ✅ Wide range of format and codec support.
- ✅ Highly customizable output settings.
- ✅ Available on multiple operating systems.
- ✅ Batch processing saves time for multiple files.
Cons
- ❌ The interface can seem complex for absolute beginners.
- ❌ Encoding can be time-consuming, especially with high-quality settings or older hardware.
- ❌ Understanding all advanced options requires some learning.
Where to Download and Cost
You can download HandBrake directly from its official website. The best part? HandBrake is completely free to download and use. There are no hidden costs or subscriptions, as it's open-source software maintained by volunteers.
